
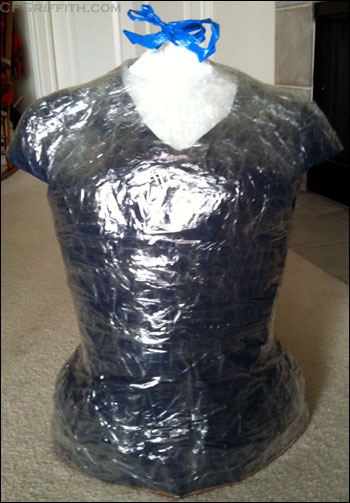
My clear packing tape dress form -- Jen Thompson wanted to try this type of dress form material, and wrapped the tape for me.
I held off posting about this until I had a chance to use it for the first time.
I mentioned recently that a friend of mine, Jen Thompson, wanted to try a different type of tape to make a dress form. Since I only have a store-bought dress form that is not even a match for my natural form, much less my measurements while wearing stays (and I definitely can’t put my stays on it) I was more than happy to be her test subject.
Clear packing tape
I’ve never made a tape dummy before, but I know there are a few variants out there. I’ve heard of paper tape, and duct tape, but Jen wanted to try clear packing tape.
Since she is an art teacher, she’s familiar with that type of tape used for sculptures. She thought it would work well for a dress form.
Making the dress form
I won’t go into details of making the dress form — mainly because I was the one getting taped at the time, but also because that’s Jen’s blog entry if she would like to do it.
There are tutorials on the Internet about how to wrap the tape to get the best fit.
Finishing the dress form
One thing I did realize, once the tape form was cut off of me — it went flimsy rather quickly.
When I started finishing the dress form with packing peanuts, my husband Christopher and I realized we needed to try to add a few more layers of tape. The waist was collapsing on itself, so he held the upper part up to help spread the dress form back to its upright position.
I simply added a few strips of tape in that area (some straight, some on an angle making an “x”), and it helped strengthen and straighten the form back to its proper shape.
Any other place that felt a little thin, we added a little extra tape.
Once the cardboard bottom went on, the dress form felt like it would be sturdy enough.
Sizing difference
Jen had warned me there was the possibility that the dress form might be a little larger than my actual measurements.
Once the dress form was finished, I measured it and noticed that it did seem to be off about half an inch to an inch. I wasn’t sure if the measurements we’d taken while I was wearing stays might have been off (sometimes my husband laces the stays tighter than other times), but I kept that in mind when I started working on the K Gown jacket.
The back and around the arms and shoulders of the dress form seem to work perfectly when I am working on making and fitting a pattern and garment. When I went to try on the jacket, I saw that the dress form is slightly bigger than me. Fortunately, I was making a front-edge closure so it was very simple to fix.
If I wanted, I could probably remove the bottom base of the dress form, carefully cut the dressform and re-tape it with a little of the excess “taken in” for a better fit. I probably won’t do that right now.
One of the other things I didn’t think about, was how far down I needed to go on the hips. Some of the outfits I will be making need to go over pocket hoops. This doesn’t seem like a problem at first, except that without my hips or legs helping push out the pocket hoops, they simply won’t stay out. It’s not a big problem — I just put the garment on my other dress form (the outfits definitely won’t close or fit perfectly on it), and see how much extra room the skirts of jackets have or need. Then I do a final check on me while wearing the pocket hoops. My store-bought dress form also does not hold out things like pocket hoops and bustles very well, either, but it is a little longer than the tape dress form so that helps.
Final fittings will always be on me
I’m not too concerned with having my dress form be absolutely perfect right now. I’m aware of the slight difference in size on the front side, and I will always do final fittings on myself to make sure things fit before they’re fully finished.
For now, I’m just happy to be able to get those back, shoulder, and arm seams fitted perfectly. The dress form does its job helping me get fittings along far enough where I can do most of the work without any help. Since I need help getting into my stays for a final fitting, my husband has also learned over the years to help with pinning or basting to get any final touches I might need.
Thoughts
Unless I gain or lose too much weight, I see this dress form helping me for a long time. Even if I do need to make another, it’s a simple list of supplies (tape, t-shirt, cardboard, and packing material), wearing my stays, and having someone who knows how to wrap the tape properly and smoothly.
I will see how long the dress form holds up over time. I do have a tendency to stick pins into the form to hold things up or closed. This makes the pins a bit sticky, and understandably causes holes to be poked into the tape. I’m hoping it won’t affect the structure, and as long as it’s not too full of pin holes, I should just be able to slap a layer of tape over the top to help smooth it out again.
Thanks again, Jen! I wouldn’t have been able to make my K Gown jacket without my new dress form!
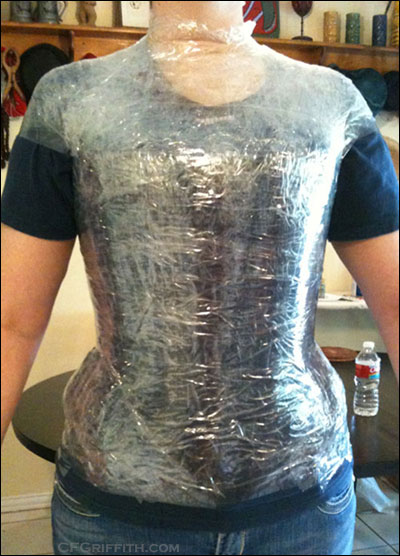
The clear packing tape dress form before it was cut off. I am wearing my 18th century stays to get the proper shape.
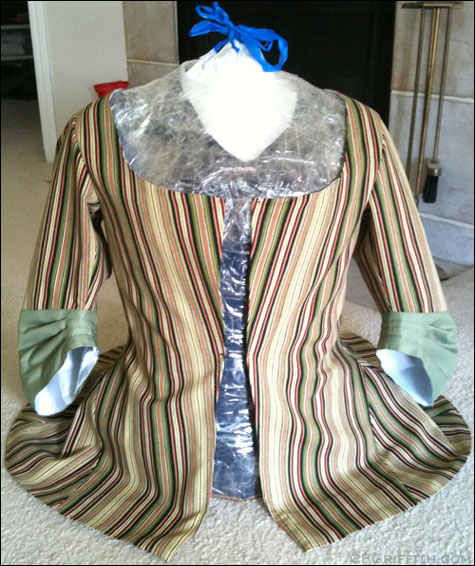
My 18th century jacket on the dress form -- you can see that the dress form is slightly bigger than I am, but I still got a great fit using it.
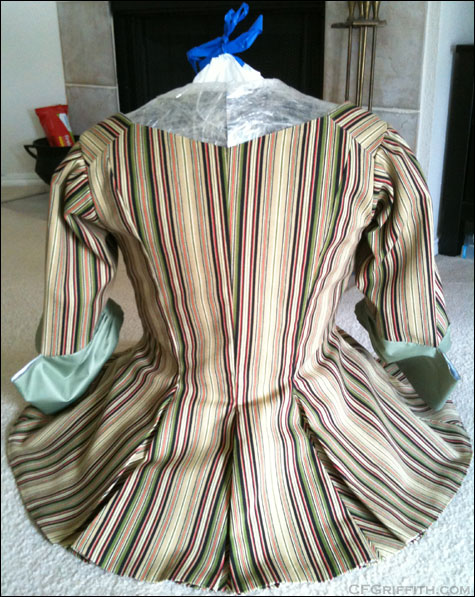
The dress form is very helpful for fitting 18th century garments -- especially on the back seams, and around the shoulders and arms. I will just need to make sure there is enough room for pocket hoops.